The past year has seen tremendous growth and support for Containerization within the Development space. Containers provide a fast and easy way to fire up a multitude of different development, test, and even production environments.
Unfortunately Docker does not run natively on OSX, an abstraction layer is needed to create a Container Runtime Host for the Docker service to run on. Enter VMware AppCatalyst and Project Photon:
- Project Photon: A lightweight purpose built Linux Container Runtime Host currently released as an Open Source Tech Preview project by VMware
- AppCatalyst: A CLI/RESTful API driven lightweight hypervisor for OSX which provides a perfect environment for running Photon instances hosting Docker services
The goal of this article is to walk the user through the initial configuration steps required to integrate VMware AppCatalyst with IntelliJ IDEA. This integration will provide the user a seamless method for automating the delivery of containers and deploying their artifacts right on their laptop without having to perform any manual steps outside of the IDE. Just tell your IDE to build your App and you’re ready to go!
Target Audience
MAC OSX users who have at least a basic knowledge of Docker and reasonable knowledge of JetBrains IntelliJ IDEA.
System Requirements
- AppCatalyst: OSX 10.9.4 or newer
- IntelliJ IDEA Ultimate Edition: 14.1 or newer
Pre-requisites
Install VMware AppCatalyst:
Follow the directions from the Getting Started guide
You should now be able to fire up a PhotonOS VM with AppCatalyst and SSH into the Photon shell prompt
Leave your PhotonOS VM powered on
It is recommended to secure your Docker Daemon for listening on a secure TCP Port: 2. Follow the Protect the Docker Daemon Guide for creating the relevant certificates, you do not need to perform the “Secure by Default” section 3. You should now have all the certificates and keys required to setup secure access to Docker from your host machine
Prep-work
- From your host machine get the IP address of your Photon instance:
appcatalyst guest getip <replace with vm name>
- Copy the client certificates from the Photon instance to your preferred folder on your host machine, in this case/home/DockerCerts/:
scp -i /opt/vmware/appcatalyst/etc/appcatalyst_insecure_ssh_key photon@192.168.135.128:"ca.pem cert.pem ca.pem key.pem" ~/DockerCerts/
- SSH to your Photon instance from your host machine:
ssh -i /opt/vmware/appcatalyst/etc/appcatalyst_insecure_ssh_key photon@192.168.135.128
- Optional: Move your server side certificates to a more appropriate folder:
sudo cp ~/{ca.pem,server-cert.pem,server-key.pem} /etc/ssl/certs/
- The Docker service in Photon is configured through SystemD. From your Photon SSH connection, modify your service file to change from Unix Socket to a secure TCP connection:
sudo nano /lib/systemd/system/docker.service
- Find the following line:
ExecStart=/bin/docker -d -s overlay
- Replace it with the following line:
ExecStart=/bin/docker -d -s overlay --tlsverify --tlscacert=/etc/ssl/certs/ca.pem --tlscert=/etc/ssl/certs/server-cert.pem --tlskey=/etc/ssl/certs/server-key.pem -H=0.0.0.0:2376
- Reboot your Photon instance or reload and restart Docker using systemctl:
sudo shutdown -r now
Or
sudo systemctl daemon-reload
sudo systemctl restart docker
IntelliJ IDEA Configuration
For this example, a simple Java Enterprise Project is used with the Web Application framework deployed as a Web Application Archive. Please feel free to create a new project, use an existing one, or follow the steps in the tutorial from JetBrains: https://www.jetbrains.com/idea/help/developing-a-java-ee-application.html
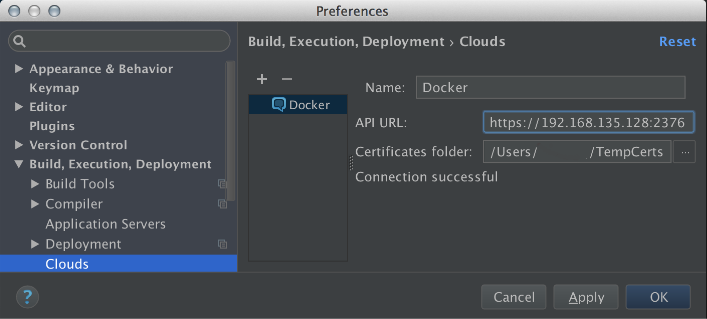
- Setup the Docker plug-in:
- Navigate to
IntelliJ IDEA->Preferences->Build, Execution, Deployment->Clouds - Select the
+symbol and addDocker - Specify name as
Docker - Specify the Docker API URL:
https://192.168.135.128:2376 - Specify the
Certificates Folderwhere you copied your client certificates to with SCP and hitOK
- Configure your project specific settings:
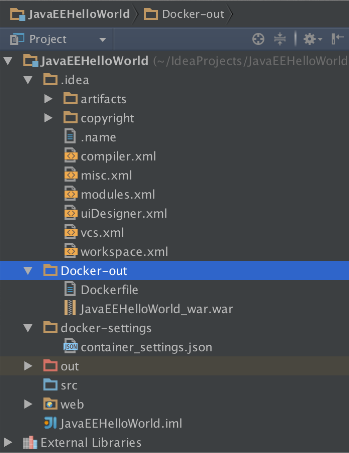
- Create a folder under your project root folder named
Docker-out - You will need to create a Dockerfile to contain the commands which are issued to Docker during image build. Within the
Docker-outdirectory, create a new file called ‘Dockerfile’ and enter the following commands. The first line specifies the base image and the second specifies the artifact you wish to add to the new image:
FROM jboss/wildfly
ADD JavaEEHelloWorld_war.war /opt/jboss/wildfly/standalone/deployments/
- Your deployment artifacts will need to be placed in the same folder as your
Dockerfile. Navigate toFile->Project Structure - Make sure your
JavaEEHelloWorld_war.warartifact is selected and set your output directory to theDocker-outdirectory and hitOK
- Now the project
Run Configurationneeds to be configured for the deployment: - Navigate to
Run->Edit Configurations, select+and add a newDocker Deployment - Specify the name as
Docker Deployment - Ensure Deployment specifies
Docker-Out/Dockerfile - Choose a name for the container name, e.g.
My-WebApp - Next to
Container Settingsclick the Green Arrow symbol and create a folder within your project folder labeledDocker-Settings - In the file-name box ‘container-settings.json’ should already be specified, hit
OK - Next to ‘Before Launch’ click the
+symbol and selectBuild Artifacts
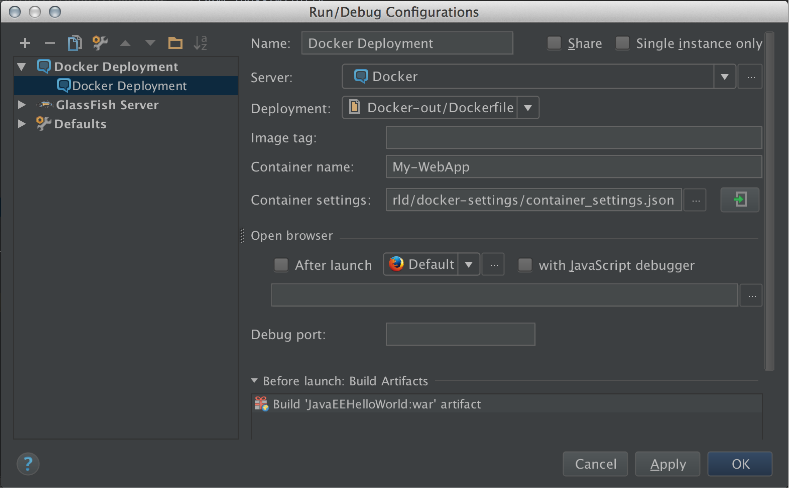
- Choose your artifact and hit
OKto both windows - Finally navigate to
Run->Run Docker Deploy
IntelliJ IDEA will now build your artifact, communicate to your Photon hosted Docker service, start up a new Container, and deploy your artifact to the container. If this is the first time you have pulled down the Docker base image then it may take 5-15 minutes to download depending on your internet connection.
IntelliJ IDEA Post Deployment Test
- To test a successful build and deploy from IntelliJ IDEA to your Docker container you can try one of the following steps:
- In your Web browser, navigate to ‘http://192.168.135.128:18080/JavaEEHelloWorld_war/’ to see your WebApp successfully running
- SSH to your Photon Instance and issue the Docker command to list running containers. You should see ‘My-WebApp’ under the
Namescolumn:
ssh -i /opt/vmware/appcatalyst/etc/appcatalyst_insecure_ssh_key photon@<insert guest ip here>
sudo docker --tlsverify --tlscacert=ca.pem --tlscert=cert.pem --tlskey=key.pem -H=<insert guest ip here>:2376 ps
What’s Next
So now you’ve configured a basic project within your IDE to work with VMware AppCatalyst, Photon, and Docker containers. You can now look to implement these settings within your own project work and deploy more complex environments with the click of a button!
Appendix
Useful Links
- VMware Cloud Native Apps Splash Page
- VMware AppCatalyst Splash Page
- VMware AppCatalyst Getting Started Guide
- VMware Project Photon Github
- Docker Docs for getting started with the Dockerfile
- Docker Docs article for securing Docker Service with HTTPS
- Jetbrains blog for configuring IntelliJ IDEA Docker Plug-in
- JetBrains guide for creating a Java EE Application
Known issues:
- AppCatalyst cannot be used while VMware Fusion is running
- Certificate configuration uses 192.168.135.128 address, if the target Photon instance is not the first instance powered on it will have a different IP address. Ensure the target Photon instance is the first instance powered on to maintain a consistent IP address